Guidelines for Teaching with Zoom
Just as in the classroom, it is important to proactively set expectations and etiquette for your Zoom sessions. You may want to set expectations about participation, speaking, muting and unmuting, webcam usage, chat, and more. Include both what students can expect from you, and what you expect from students.
The following collection of tips and observations from hands-on experiences teaching with Zoom is revised for faculty at UNC-CH from the original guide compiled by a group of faculty at the University of Southern California: Patrick Crispen, Patrick Dent, Anitha Cadambi, Francis Pereira, Alison Chu, and Maryann Wu.
Set Expectations in Advance
- Camera Requirements: Let students know in advance if there are portions of class sessions in which they will be expected to activate their web cameras: throughout the entire session, when you are not sharing your screen, when they are in breakout rooms, during the first or last 5 minutes of the session, etc. Requirements and/or expectations should be clearly detailed in your syllabus, in your Sakai site, and throughout your first several Zoom meetings.
- Video Off: Plan to offer alternatives for students who may not be in a position to use their cameras in some or all class sessions. Encourage students to contact you in advance if they face unanticipated challenges in attending class Zoom sessions when they are expected to activate their web cams.
- Profile Pictures: Ask students to upload a photograph to their Zoom profile that will appear when their camera is off. This may be an opportunity for students to share something about themselves if they choose such as pictures with pets, participating in hobbies, etc.
- Nonverbal Feedback: Enable the Zoom setting for nonverbal feedback and reactions and create in-session activities which encourage their use Regardless of whether students have their cameras on, this is an excellent way for them to participate en masse and show engagement without interrupting the flow of the session.
- Awareness of Environment: Encourage students to connect to class Zoom meetings from locations with as few distractions as possible and where they are safe/comfortable (e.g., not while driving a motor vehicle). Remind your students about the importance of being mindful when their web cameras are on, particularly about what is happening behind them (i.e., roommates and loved ones who may unknowingly be in the background). We suggest participants position light sources in front themselves, with a wall or virtual background behind them and/or select a virtual background through their Zoom video settings.
- Chat Expectations: Zoom’s chat function can enhance engagement and learning, but without clear guidelines for use, it can quickly become a distraction, particularly for people who have challenges with multi-tasking. Communicate in advance what students should, and should not, use the Chat box for during class sessions. You may also want to assign a designated student moderator to help you keep up with chat activity. Consider disabling the private chat feature unless you want your students to be able to send one-to-one messages to other students. See the Review Zoom’s hidden settings section below for more information.
Practice First
If you have not used Zoom yet to teach before, take some time to practice and familiarize yourself with the interface. Because Zoom runs on multiple devices – including mobile phones – one great way to practice is to launch a Zoom meeting on your computer and then sign into that meeting on your iPhone, iPad, or Android Device. Leave the audio off in order to avoid getting audio feedback. Zoom’s guide Host and Co-Host Controls in a Meeting reviews the menu and most of the functions you will need to know.
Familiarize Students with the Interface
Chances are most of your students have used video chat software like Facetime, Google Duo, WhatsApp Hangouts, and whatever Microsoft is calling Skype these days to communicate with friends and loved ones. That’s different than using web conferencing for scholarly purposes. Do not assume that your students know how to use or learn in Zoom. You will have to teach them.
In particular:
- Remind your students to download and install the Zoom app on their devices well in advance of the first class meeting. If you have expectations about what type of device they use to participate – for instance using a laptop instead of a mobile phone – you’ll want to make sure you let them know that.
- Give your students a tour of the Zoom interface during your first class session and teach them how to mute and unmute themselves. Remember: This may be the first time your students have ever used Zoom. Typically, you want students to set up and test their audio on entry, but then mute their audio until they need to speak. This means they will be poised to participate but will not contribute background noises or echoes to the class in the meantime.
- Show students how you want them to get your attention. In small classes, some professors ask students to raise their hands on their web cameras. Others ask students to unmute themselves and simply chime in. In larger classes, you may want to consider using Zoom’s built-in nonverbal feedback buttons. These buttons are disabled by default, but we’ll show you how to turn them on in the Review Zoom’s hidden settings section below.
- Show your students how to use the Alt + Tab keys on their Windows laptops or the Command + Tab keys on their Mac laptops to switch back and forth between Zoom and whatever program they use to take notes.
Use the Mute Function
Sometimes a remote user will accidentally leave his or her microphone on, which can drown out class conversation with background noise. Knowing how to use Zoom’s mute function will help you quickly fix the situation.
Mute or Unmute All Participants (Except Yourself)
- Click on Manage Participants in the meeting control toolbar; and

- Click the Mute All or Unmute All button at the bottom of the participants list.
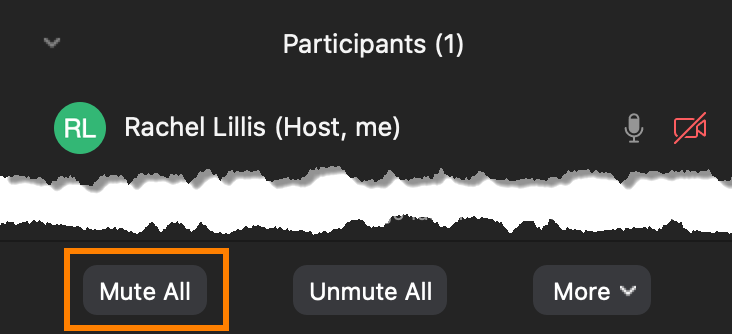
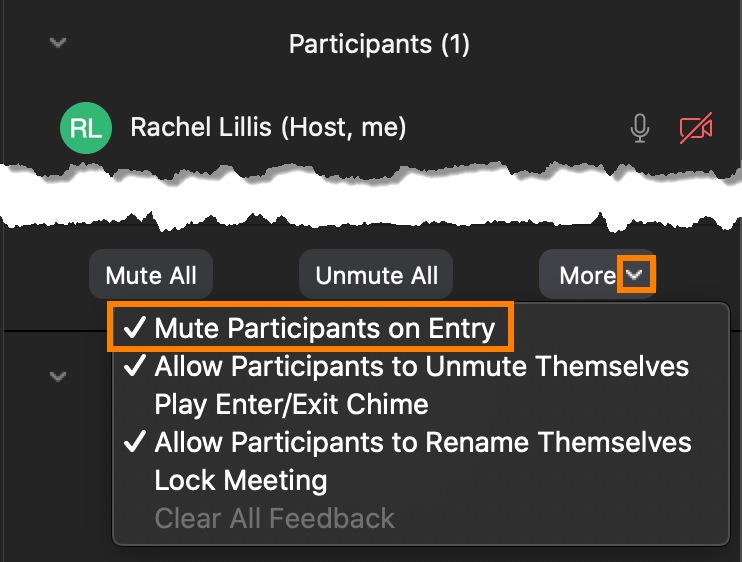
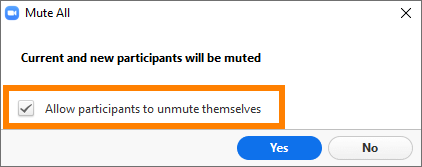
- Clicking Mute All will Mute everyone except the Host (you) who is currently in the Zoom session. If someone enters after you Mute All, they may not be muted. However, you can Mute Participants on Entry from the More menu at the bottom of the participant list.
Mute Or Unmute a Particular Participant
- Click on Manage Participants in the meeting control toolbar

- Hold your mouse over the name of the participant to show the mute/unmute buttons.
- Click Mute or Unmute.


Note: The first time you manually try to unmute a muted participant, that participant will be asked to either “Unmute now” or “Stay muted.” The participant will stay muted until he or she clicks “Unmute now.”
Promote Active Learning
Yes, it is relatively easy to give a PowerPoint lecture in Zoom. It is also relatively easy to use Zoom to have your students engage in a classroom debate, analyze a real-life case, participate in a think-pair-share activity, collaborate on group work, play games and simulations, take a virtual field trip, give student or group presentations, and much more. Mix it up.
Use Breakout Rooms
Zoom allows you to split your students into separate breakout rooms for small group projects and discussions, but this feature is disabled by default. To enable it, log in to https://unc.zoom.us/profile/setting and turn Breakout room on in the In Meeting (Advanced) section. You only need to do this once.
Once you have enabled breakout rooms in your Zoom account, you can either pre-assign students to breakout rooms before class begins or manually create breakout rooms and assign students to them during class. Zoom’s Managing Video Breakout Rooms guide will show you how to create breakout rooms, assign students to rooms, manage breakout rooms, broadcast a message to your breakout rooms, and end a breakout room session.
Use Polling
One of the best ways to get immediate student feedback is to poll your students during class. Zoom also has a built-in polling tool, but it is turned off by default. To enable it, log in to https://unc.zoom.us/profile/setting and turn on Polling in the In Meeting (Basic) section. You only need to do this once.
Once you have enabled polling in your Zoom account, you can add poll questions before class begins or you can manually create poll questions during class. You can only create a maximum of 25 polls for a single meeting.
If you have a smaller class and your students are sharing their webcams, you can also poll students by asking them to display a thumbs up, thumbs down, or another obvious hand signal.
Use Zoom to Pre-Record Lectures
If you unable to attend a particular class meeting, remember that you can always use Zoom’s built-in recording tool to pre-record your lecture. Launch a Zoom meeting with yourself as the only participant, click Record (to the Cloud), and give your lecture. This is also a great way for you to ‘flip’ your class – pre-record the declarative and procedural knowledge you want your students to learn, ask your students to watch the recording before class, and then use class time to focus on application, discussion, and higher-order thinking. Since you can share your screen, remember that you can show YouTube videos or anything viewable on your computer. You are not limited to PowerPoint only. If you switch between programs, you may want to use Alt + Tab on Windows or Command + Tab on Mac to switch between programs. You will want to mindful of what files or photos you display on your desktop if it will be visible.
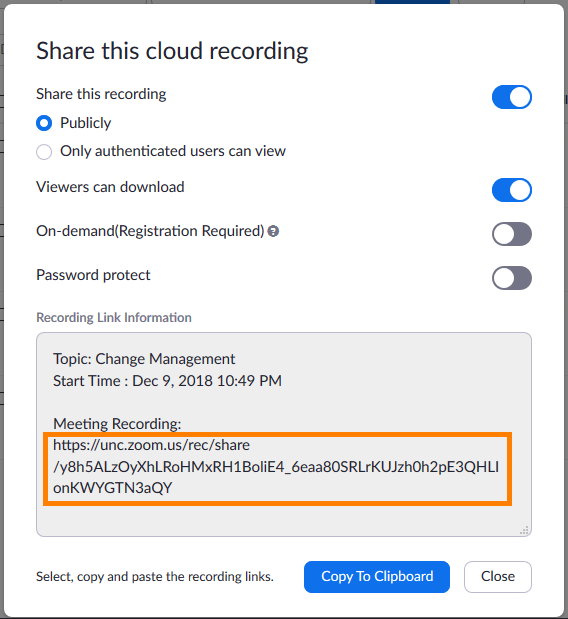
Your cloud recordings are saved to https://unc.zoom.us/recording. Click the Share button next to a recording to see the options for sharing that recording. – for example, enabling or disabling the option for students to download a copy of your recording – and to see the link that you can share with your students so that they can stream your recording. You can copy the Meeting Recording link from the grey box or click Copy to Clipboard.
If you record a class meeting, and students stick around after class to ask questions, stop the recording before answering the questions … and consider using breakout rooms.
As with face-to-face classes, your students will stick around after your Zoom class meetings end to ask you questions. Some of these questions can be deeply personal. You do NOT want to record those. Stop the recording before you take any questions. Also, if there are a lot of students hanging out after class and one of the students needs to talk to you about something private, offer to put that student in a private breakout room and talk to him or her there.
Use In-Meeting File Transfer
One of the easiest ways to share files with your students is to use Zoom’s hidden in-meeting file transfer tool. To use it, just click the File button at the bottom of the Chat window. Students will see a notice that a file has been made available and will be given the option to download it. The largest file you can upload is 512 MB.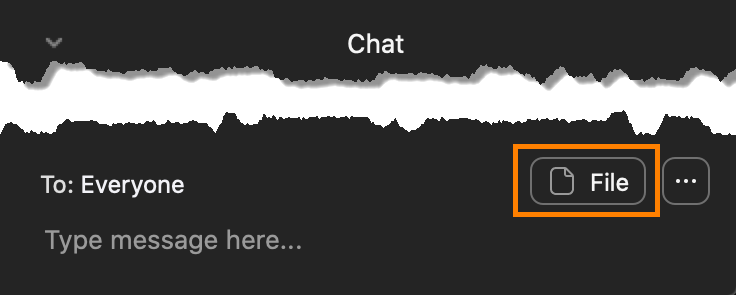
Review Zoom’s Hidden Settings
- Private chat. By default, Zoom allows students to send private, one-to-one messages to other students without you seeing the messages. Some professors choose to disable this.
- Display end-of-meeting experience feedback survey. Zoom can ask your students to complete an on-screen thumbs up/thumbs down survey at the end of every class. If students give a thumbs down, they can provide additional feedback. The end-of-meeting experience feedback survey is disabled by default.
- Always show meeting control toolbar. By default, this is disabled. This means that the control toolbar at the bottom of your Zoom window automatically hides when you are not using it and reappears when you move your mouse anywhere in Zoom window. You can change this if you want.
- Nonverbal feedback. On the participants list, attendees can click an icon to provide feedback to you (things like Raise Hand / Lower Hand, yes, no, go slower.). This is disabled by default. If you enable it, if a student clicks on a feedback icon, you’ll see that icon beside their name on the participant’s list. If a student clicks raise hand, you can lower their hand by hovering over their name and clicking Lower Hand. Click clear all to remove all nonverbal feedback icons.
- Attention tracking. Zoom has a Big Brother-like feature that will show you an indicator on your participant panel if a student does not have Zoom in focus (in other words, if a student has opened and is paying attention to another program besides Zoom) during your class. This is (happily) off by default.
Know Zoom’s Limitations
Zoom is arguably one of the best web conferencing platforms available. But it was designed more for live, one-off meetings than for recurring classes or lectures. For example,
- Student notetaking. Unless your students have large screens or external monitors, taking notes during a Zoom meeting requires that they frequently switch back and forth between Zoom and whatever program they use to take notes. There is no other workaround other than the students connecting to the Zoom meeting on a device separate from the one the students will be using to take notes.
- Pre-loading content. In a traditional learning management system like Sakai, you can access your course site before the semester begins, change the site’s layout and appearance, upload documents and assignments, and more. You cannot do any of those things in Zoom. Zoom is simply a live web conferencing platform that lets you share your web camera and computer screen with others.
- While Zoom has a polling tool, it does not have a testing or exam tool. If you want to give your students a graded assessment, you will need to use an external tool like Sakai’s Test & Quizzes.
- Zoom can create a report showing who attended a particular Zoom meeting, but that report is hidden. Go to https://unc.zoom.us/account/my/report, search for a meeting within a one month window, and then click on that meeting’s number of participants in the Participants column.
- Breakout rooms. Zoom offers breakout rooms (see above for instructions on how to enable them) and you can either create them and assign students to them live during class or you can pre-assign participants to breakout rooms before class begins. Unfortunately, there is no way to pre-populate your breakout rooms with content or instructions before class begins. In addition, when your class meeting ends the breakout rooms that you create in Zoom disappear and will not appear in your next class meeting. Unfortunately, we are not aware of any workaround.
- File sharing. While you can share files using the Chat box, Zoom meetings are not really meant to be file repositories. Also, the largest file you can share is 512 MB. Tip: If you want to create a file repository for your course, use Resources in Sakai.
- If a poll contains multiple questions, your students must answer all of the questions and then click submit before Zoom will record any of the students’ answers. In addition, only single choice or multiple-choice questions are allowed. Tip: for more advanced polling features, use Qualtrics or Poll Everywhere.
- Zoom’s whiteboard (see Sharing a Whiteboard) is an effective tool for summarizing key points during discussions, but the button students click to download a screenshot of the whiteboard is hidden. While the whiteboard is on the screen, the students have to click the View Options pull-down list at the top of the whiteboard and then click Annotate. Only then will they see a Save button.
Keep up to date with Zoom’s features
Finally, Zoom regularly adds new features. To keep up to date with what’s new, check out Zoom’s New Releases page. For more detailed information, visit Zoom’s Release Notes page.
